
Guess I'm one among millions who appreciate the simplicity of
Shaker style, and who doesn't love the quintessential
oval box. So when I became aware of an opportunity
to be in a workshop to make my own oval box
while living not too far from the once-vibrant
Canterbury Shaker Village farm operation,
how could I resist?

Three weeks ago, on a Saturday, I drove the 35 minutes
to Canterbury Shaker Village in New Hampshire -
luckily well within our Mission boundaries -
to be taught, and shown, and also
to FEEL what it is like to create an oval #3 box
in the fashion that the Shakers have done.
(This quote is from a different historic location.)

As this informational page below outlines,
the Shakers were all about simplicity and usefulness.
They envisioned, then created, then improved upon
the oval box container, using them as we might
employ 'Tupperware' plastic containers today,
to keep and store almost anything except liquids.
The lids were made to fit tightly to keep contents safe.

Here is the historic Brethren's Shop building at
the Canterbury historical village site, where the oval box
class was held. We were in one of the classroom
workshops on the second floor, on the right of this shot,
but on the backside of the building.

This informational sheet describes the building.
It was part of the rich experience to be sitting,
and listening, and watching and working inside.
Long after the Shakers lived and worked here,
others who knew the wood craft have built
objects including oval boxes for sale
in the Village's gift shop.

This is the 'looking south' view from the workshop room.
You can see the belt sander, and the stack of fitting forms
for the various sizes of oval boxes that were regularly built.
With total practicality in mind, the boxes with lids in place were
sized so they could be 'nested' or stacked inside each other
when not in use, to maximize precious living space.
Practical simplicity is what we remember Shakers for,
but it is NOT tied to their religious tenets, interestingly.

This is Dick Bennett, our instructor, who has a long
history as docent, instructor and friend of the Village.
Here he is laying out the pre-cut body and lid cherry strips.
The overlap fingers were roughly cut out before we
started, but we refined and trimmed the 'fingers' of each
that are part of the classic oval box design,
using sharp art knife-style blades.
A slight bevel was trimmed from
the shaped edge of each finger, as the first step.

Next, the strips were thinned on the upper side
of the inside butt ends, and on the underside
of the fingers ends using a belt sander.
This step is important to assist the overlap transition,
with shaping done about 3-4" in from ends only.
After the "thinning", the strips were marked with
penciled initials, then placed inside this copper
basin filled with hot water and oxalic acid for
a 40 minute soak. The water softens the wood
just enough, and the acid protects
the wood from losing its beautiful cherry coloring.
The box rests on top of the small electric stove
which was the source of the heat for the acid bath.

After the soak, the base strip is immediately taken
to the two-part (connected) shaping form,
shown here in the vice clamp on the end of Dick's
work bench. The base strip butt end
is positioned at topside center, then carefully and
slowly formed around the shape with controlled
hand pressure, with the base released as needed
to continue to shape the fingers end, then
the two ends brought back together with butt end under,
and the body band is 'snugged' in as tight as possible.

Without letting go, eight tiny copper nails were positioned
and hammered to hold the formed wood strip
together. The nails are short enough that they
only penetrate the depth of the two layers,
and don't really penetrate into the interior.

After the body, the lid rim is formed in similar manner
right on top of the body strip that is still in place,
EXCEPT the lid must be marked with alignment ticks
so that it can be removed from around base,
taken to the nearby anvil, where the oval ring
is reformed according to the overlap marks so that
four tiny nails can be tacked in place to hold it.
Once body and lid ovals are formed,
the key that holds the form together
is pulled out, the form collapsed together slightly
which allows the box body strips to be
carefully worked off. The lid rim is re-fit onto the body
in prep for the next drying steps.

Each student stepped up to the workbench
and (in front of the other students) repeated the bending,
forming, nailing process. I was second, and
as I got to the lid rim steps, my strip, which had
a defect that was mostly invisible, could not
take the bending pressure and snapped in two.
All the guys and Dick felt sorry for me.
(Did I mention I was the only woman?)
But since this is a fairly common challenge,
and is a great object lesson, I didn't mind.
(We quickly repeated the prep steps, including
the soaking while we took an exercise break.)

The final step before drying is to fit a separate
top and bottom oval form into the shaped hull
to prevent it from warping as it dries.
Here, Dick fits these into the sample box.

Here below is my box with the drying forms in place.
Almost without exceptions, the boxes are made
as 'right handed' boxes, which means that when
the back of the box is tucked against the maker's stomach,
with the nails outward, the maker's right hand
can be placed over the fingers of the box
to sort of duplicate their positions.

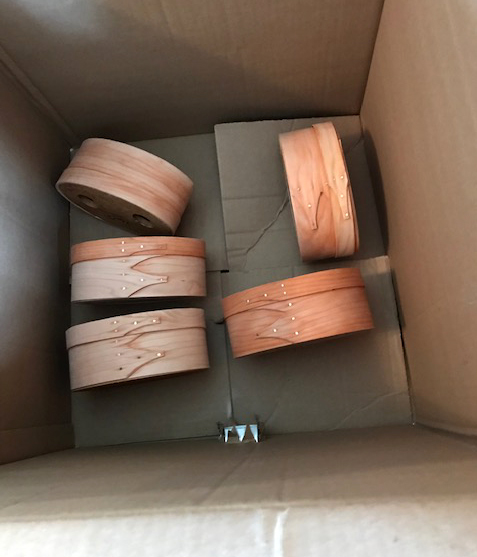
Into the drying box they go. In a traditional,
non-workshop setting, the boxes would air dry
for a couple of days. This drying box is a simple
brown corrugated carton, with seams sealed,
and with a vent hole fashioned to accept
a common household hair blow dryer nozzle,
as can be seen at the bottom (silver collar).
When the hull is taken from the dryer,
it is given a preliminary sanding to make sure
upper and lower rim edges are "flat" - mostly
at the overlap seams. (The sand paper we used
is purple, and must be used on a known flat surface.)

Not shown are the next steps where the hull and lid
are each placed on top of the MDF with cherry veneer
plaques approx. 1/4" thick that will form floor and
roof panels, and a pencil tracing made
along the inside of the oval.
The shapes are rough cut on a band saw,
then this disc sander is used to remove the remaining
material to take it as close to the pencil line as possible.

Final refining is done with hand sanding,
then the panel is fit-checked with the formed bands
until they fit as perfectly as possible.

Here is my box with panels ready to be
finally positioned and attached.
A very light glue is applied to panel edge,
then they are fit together with rim and surfaces even.

The bottom and lid panels are "pegged" into place
using tiny wood shafts, in this case, cut-to-length
square/round tooth picks, shown here.
To simplify the pegging process, pilot holes are
drilled through bands and into side thickness of
the roof or base discs. Dick's workshop had a drill set up in
a sort of jig, laying on its side and strapped in place,
with a platform where the box component could be slid
to engage the running drill bit at the selected positions
and at the exactly required height,
and the pilot holes were drilled in rapid succession - slick!

The half toothpicks are fit into the holes
(after tiny amount of wood glue is carefully applied
to the hole), then tapped into place with a fine hammer.
Then the excess pick is clipped off. A final sanding
takes the nubs down to be even with the surface.

Final surface preparation now needs to be completed,
including at least three grades of careful hand sanding
of exterior and a bit on the interior as well.
Then patching of the overlap gap, then finishing with linseed oil.
I will cherish this experience, the way it made me feel
to be working with this historic form, and to have a piece
of history to possess and which will recall those fun memories.
Thanks to Dick, and to the others who have worked
and planned and prepared to share in this special way.
The light of my lamp will burn because of them!
Wow - that must have been some experience Jodi :-)
ReplyDeleteIt was wonderful and very memorable, certainly. Thanks for reaching out to me like this. I miss our more regular chances to chat!
Delete